Overview
There are quite a lot of postings on the web about upgrading to ESXi 5.1 and running from a USB key but this post is more about my experience and basically a note to myself about what I did so if I have to do it again I know what I did. Who knows it might help someone else.
It is worth noting that ESXi 5.0 only runs on a 64bit CPU.
History
When I started using ESXi the standard method I used was to install the hypervisor onto one of the drives and run it from there. Then for me around v3.5 I started booting the whole thing from a USB key. In the beginning it was more of a “you must be kidding” sort of thing especially when you were using ESXi in a business environment. But then I found it to be reliable and it gave me an easy way to backup – just back up the key using a key imaging tool such as USB Imaging Tool. An too upgrade was simple, just grab a new key with the next version on it and config the ESXi box again – generally not too much work. By using a new key you have an easy rollback, just stick the old key in 🙂
In the past you downloaded the VMware iso image for 3.5, say, and then extracted the contents and looked for:
/usr/lib/VMware/installer/VMware-VMvisor-big-3.5.0-xxxxx.i386.dd.bz2
All you did then was unzip the above file and the resultant “VMware-VMvisor-big-3.5.0-xxxxx.i386.dd” file is a valid image file that can be restored to a USB key using the USB Imaging Tool.
As of version 5.0 of ESXi that doesn’t work you need to do a full install !
Resources
ESXi ISO
Obviously you need to download from VMware. You will need to register and signup and so on. In my case the ISO was “VMware-VMvisor-Installer-5.1.0.update01-1065491.x86_64.iso”
USB Imaging Tool
An excellent Windows tool for backing up and restoring USB keys:http://www.alexpage.de/
PLoP USB Boot Floppy
PLoP is a floppy disk image that will allow a machine which boots to floppy but not USB to boot to USB: http://www.plop.at/en/bootmanager/full.html
Install process
Outline
With 5.1 the installer can install and then boot from a USB key. The thing is that it is much better to create the key away from the ESXi server that way you can minimize the downtime of the server so doing the install on the actual box is not ideal.
The obvious way to do it is using a VM on a desktop however there are a few twists to doing this.
The strategy is to:
- Create a simple VM in VMware Player
- Add the ESXi ISO image as the “iso image file” for the CD/DVD
- Boot the VM
- Add the USB key to the VM as a “Removable Device”
- Run the VMware installer selecting the USB key as the storage device
- Once ESXi has been installed configure the setup of ESXi on the key
Sounds simple but creating a suitable VM is not as simple as it sounds. The first thing to appreciate is that since ESXi 5.0 is 64bit only that means you need a 64bit VM in VMware player and VMware Player requires that “Virtualization Technology (VT)” be enabled on the host machine in order to run a 64bit VM. Thus in my case it meant I needed to enable virtualization technology in the BIOS of my HP laptop
Requirements
Using the process I am describing the below are the requirements I found for the process. If you do it other ways the requirements may differ:
- Laptop/PC to create the USB key. This machine is not going to be changed so it can be your regular desktop.
- Laptop/PC to have 2GB of RAM free for a VM
- Laptop/PC CPU to be at least dual core with “Virtualization Technology”
It is well worth noting that not all USB keys seem to be capable of booting. I have had a number of occasions when the BIOS would not let a particular key boot. So plug the key into the server and check it is recognized before setting it up.
Steps
The following describes how I installed ESXi onto a USB key in such a way that the key will boot an ESXi server. In my case I was using an HP 8530p laptop – a 64bit 2 Intel Duo CPU T9300.
| 1. | Ensure that “Virtualization Technology” is enabled in the bios of the PC running VMware player. Obviously this will require a reboot. |
| 2. | Create a new small VM in VMware Player. It should be:
|
| 3. | Boot the VM |
| 4. | Add the USB key as a “Removable Device” in the VM |
| 5. | Start the ESXi installer |
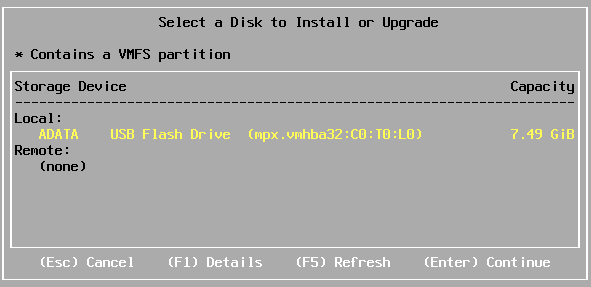
| 6. | Keep going through the installer accepting defaults and agreements until it scans for devices. You need to select the USB key:
|
| 7. | Confirm you want to override the current partitions on the key: |
| . | Continue accepting defaults including a root password |
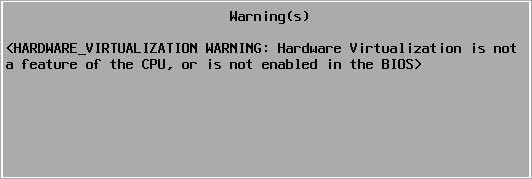
| 9. | If you get a warning about “Hardware Virtualization is not a feature of the CPU” you can ignore it: |
| 10. | Continue to accept the defaults |
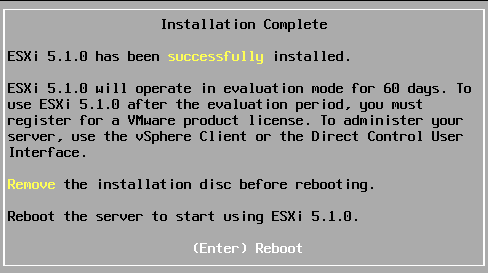
| 11. | When finished installing it will prompt you to reboot. You should reboot and this will fail, but don’t worry. Once it has rebooted just power off the VM: |
| 12. | When the VM is shutdown configure the CD/DVD so that “Connect at power on” is deselected. |
| 13. | You should download PLoP, as described earlier, from their web site, http://www.plop.at/en/bootmanager/full.html. You could also use the image from Zoyinc: PLoP_Boot_USB. |
| 14. | Edit the VM config so “Connect at power on” is selected for the floppy disk and “Use floppy image file” is set to the FLoP image you dowloaded in the earlier step. This is because the VMs in VMware player 5.0 don’t support booting from USB. |
| 15. | Start the VM and you will be presented with the menu from PLoP. Select USB from the menu: |
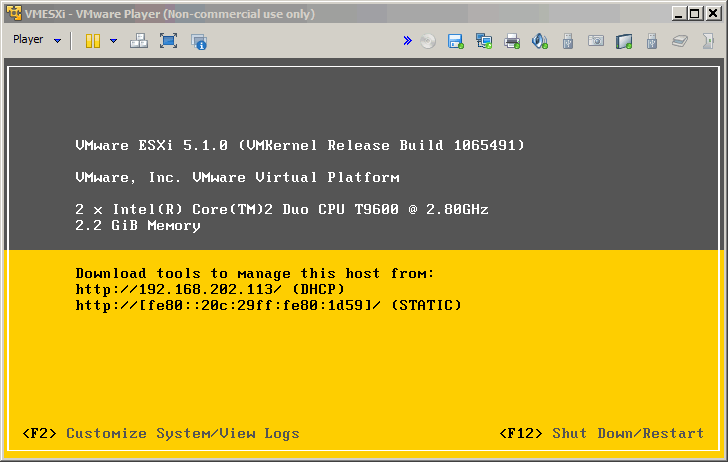
| 16. | Hopefully it should now boot like a normal ESXi box: |
| 17. | Now configure your new ESXi box, potentially mirroring settings from the box you are upgrading.This post is not a guide on ESXi so it doesn’t explain how to configure ESXi – I assume you know how to do that. |
Notes
Make sure that you have installed the key for ESXi and that it recognizes that fact. The last thing you want is to find out in 90 days time the server stops working because the evaluation license expired.
When you come to configure the new install of ESXi hopefully you won’t find it too much work. I was pleased to find it recognized the names I had given my storage devices. This really helped because I had at least one VM which had drives from multiple storage devices





![[L] – WordPress UAM Locked Post](http://www.zoyinc.com/wp-content/uploads/2024/04/WordpressUAMLockedPost_Featured.jpg)
