The goal when I archive CDs is to get the best possible digital quality from my CDs and be protected against the loss of my collection. I don’t have as big a collection as many but I like most of the CDs I have got and I don’t want to have to hunt for them again if we have a fire or burglary.
For me it became clear the artwork from the CD was very important. It is amazing how interesting and illuminating the CD booklets can be. Additionally there are occasions where you need extra info, like checking the actual track listing, checking if it is remastered etc.. By backing up the artwork as well as the disk you have everything and should not need to get to the actual CD.
For each CD’s artwork that I archive I put everything in one folder per CD. I believe in having a standard naming convention for files and folders, this means that in the future if you want to automate things like unzipping them it will be much easier.
Steps
My experience is that the biggest problem when archiving a CD is the quality of the disk itself – often it will have scratches or pin holes meaning a perfect rip is not possible. So the first thing I do is RIP the CD using Archiving a CD using Exact Audio Copy (EAC). If the CD rips without error then and only then, do I start archiving the artwork.
There is a lot of effort required to archive the artwork of a CD and it is a bit pointless if the rip doesn’t work 🙂
When ripping a CD you create a folder for each CD – so if it contains multiple CDs, like a double album then you have two folders. By the time you are finished they will be combined to one folder, but initially they should be in separate folders.
My philosophy
There are two broad approaches you can take when doing a bunch of CDs. You can do one CD at a time from beginning to end or you can do each phase for all CDs together. My personal approach is to rip all the CD, scan all the CD artwork, tidy up all the artwork and so on.
Multiple CD
If you have a multi CD set, say Steve Wonder’s “Songs in the key of life”. I just rip them into folders “Stevie Wonder – Songs In The Key Of Life – CD1” and “Stevie Wonder – Songs In The Key Of Life – CD2”.
Regards the artwork I put that ONLY into the “…- CD1/raw” then “…- CD1/fixed” and finally “…- CD1/stuff” folders.
By the end of the ripping and tidy up processes the CD2 rips will be merged into the CD1 folder – AFTER the songs have been tagged as “disk 1” and “disk 2”.
Create Folders
We need a group of folders. Imagine we are ripping “The Beatles – Sgt Peppers Lonely Hearts Club Band” create folders “fixed”, “raw” and “stuff”:
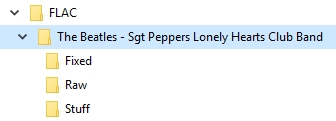
I usually achieve this by creating three empty folders for the first album, fixed/raw/stuff, and then copying these folders to all of the other CD folders.
Scanning
This phase is the initial raw scanning of the CD artwork. We will use the folder called “raw” in the root of the CD folder.
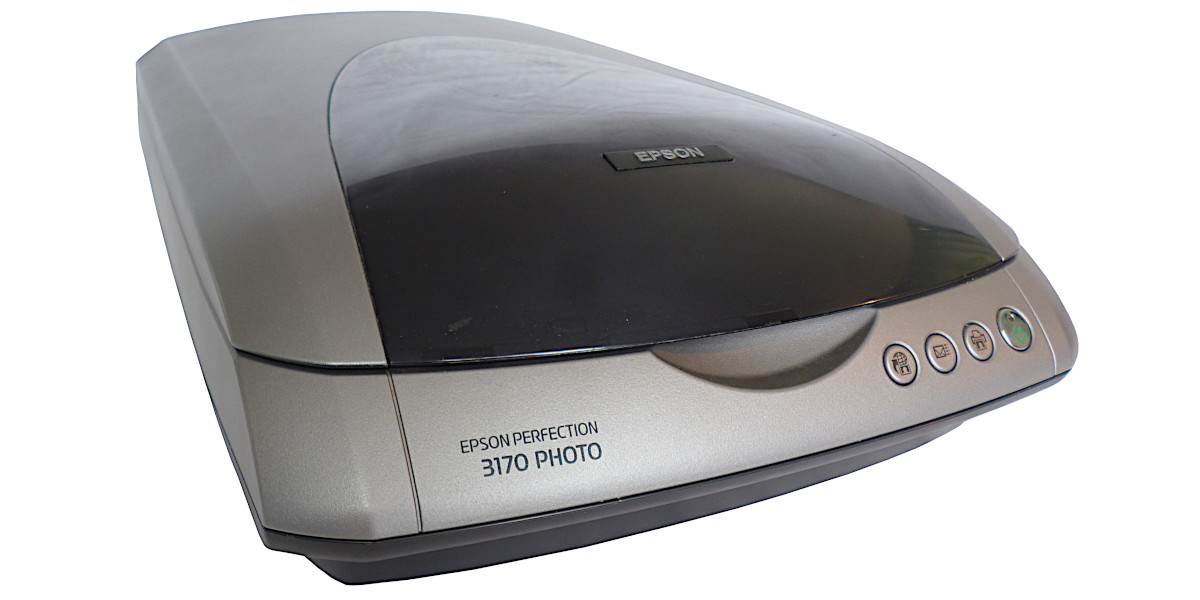
Before you begin don’t forget to clean your scanners glass! You may even need to clean the inside of the glass: Cleaning the Epson 3170 scanner’s glass
The following are the scanning options I use with my handy Epson scanner:
- 800 dpi
- 24 bit color depth
- Save as JPG maximum quality
- Deselect all adjustments like unsharp mask, color restoration etc.
- Set “Auto Exposure Type” to “Photo” – Epson scanners
- Filename prefix “Scan_” with “Start number” set to zero
- Set a suitable folder, in my case “raw”
- Disable “Show this dialog box before next scan”
- Disable “Open image folder after scanning”

Save the Epson scan settings
The settings above can be saved for next time by clicking “Save”
Moreover when you do this it will save it as “Settings 1”, which isn’t very helpful. You can change this by editing the registry using “regedit”. Close “Epson Scan” and run regedit. The key is at:
Computer\HKEY_CURRENT_USER\SOFTWARE\EPSON\EPSON Scan\ES0032\User Setting\User Setting 0

I changed it to “CD Art Work”:

Why these settings
I have chosen 24 bit because in reality all the tools I use, Gimp 2.8 and Ifranview, don’t work with 48 bit natively.
I have chosen JPG vs TIFF because in the first place I couldn’t save TIFF compressed from my Epson with the resulting uncompressed TIFF file being 206MB vs 7.1MB for JPG. I just don’t have enough storage if I am doing a lot of CDs
With rectangular images like CD booklets it really is much easier, all around, if they are scanned nice and square initially.It should also be noted that not all scanners scan completely to the edge of the glass platen. I would suggest putting say a ruler hard against the edge of the scanner and then pushing your material against that. This means your image will be nice and “square” but you won’t have to rotate it later in Gimp.
It is worth noting that some CD covers actually fold out so you need to scan something longer and possibly bigger than your scanner glass. If you have to do this it will be much easier lining things up if they are dead straight to begin with, so again it is very import to scan the images straight.
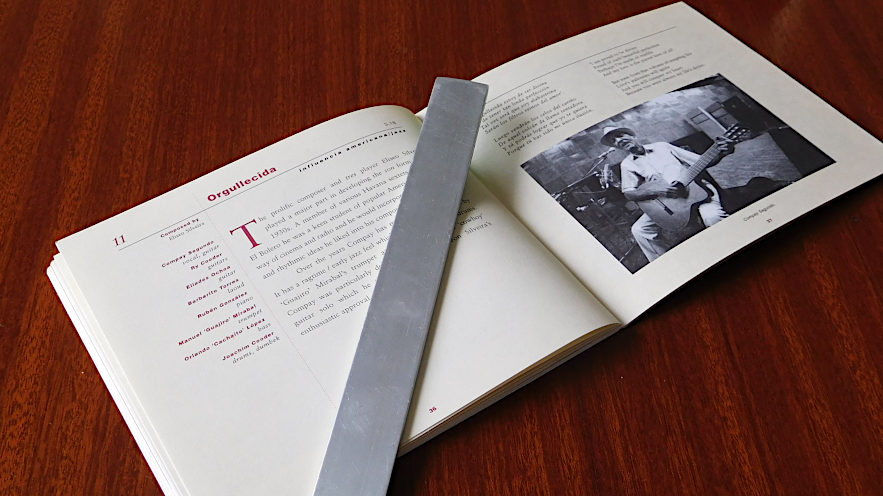
For myself I got a strip of thin aluminum from Mitre10 and stuck some sticky felt on the bottom:
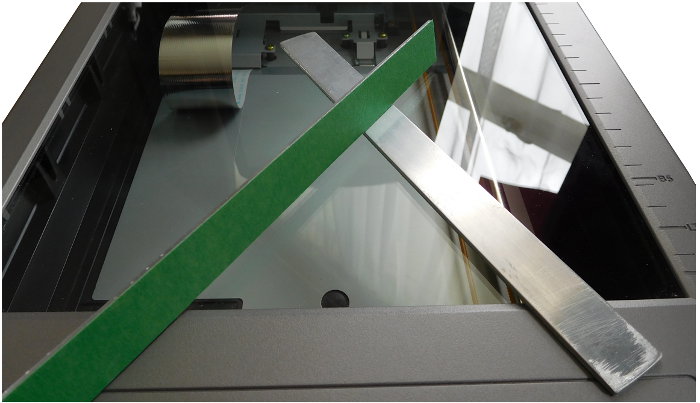
Thus you would put you booklet etc like:
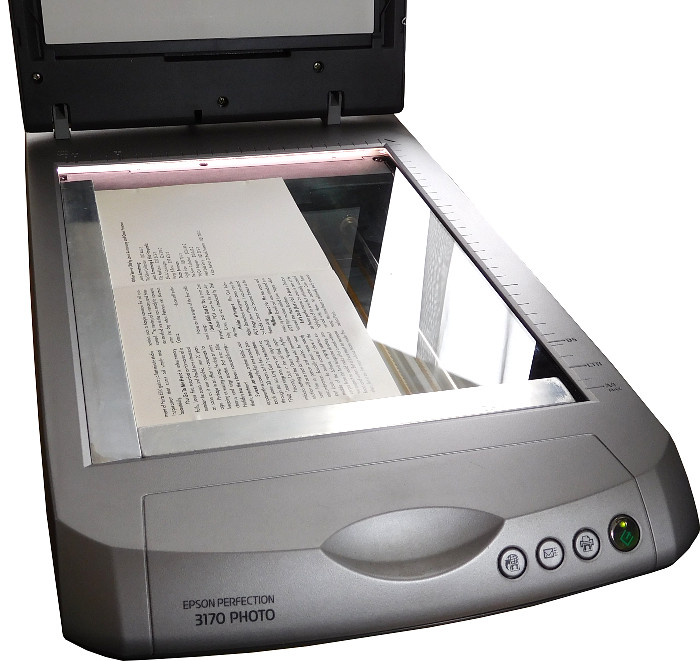
So that when you scan it you will get everything lined up straight and able to select outside the image:
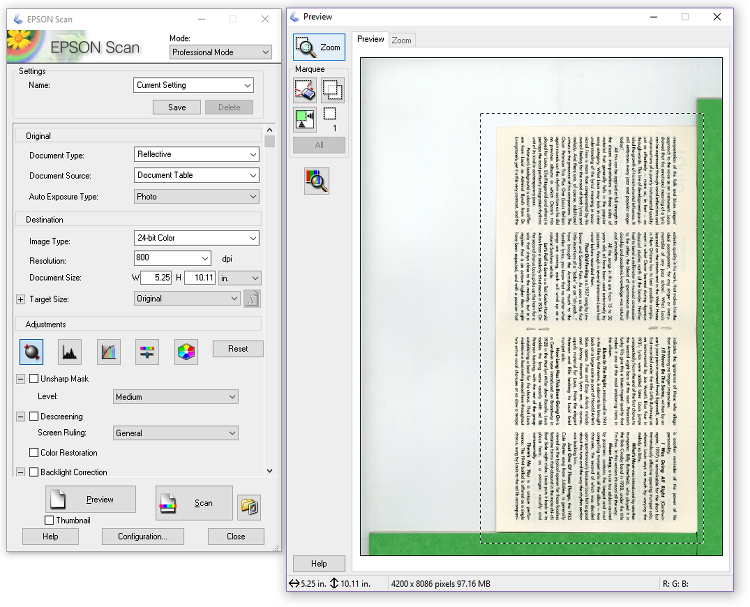
I scan with a wide border around the actual image and then crop in Gimp. For the booklet for example I usually scan two pages at once by opening up the booklet flat. When it comes to the CD label I would not be too fussed about getting it perfectly straight on the scanner, this is very difficult, just scan it and then rotate in Gimp – way easier.
I scan at 800 dpi so that all image manipulation is at a high resolution. Then finally move to 400 dpi using Irfanview, because bearing in mind the printing process and the resolution of the images, anything more than 400 dpi really doesn’t give much benefit.
Scanning the CD Label
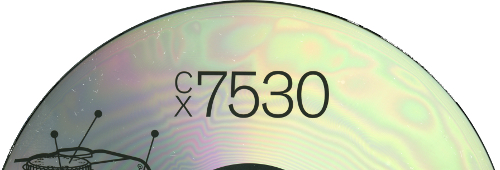
Scanning the labels on the CDs can be tricky. The real issue is with old cds where there was typically black writing on the silver disk. The problem is the silver with the very thin tracks. You can get the effect below, or worse. See my post Removing interference patterns when scanning a CD for ideas on how to work around this
Fixing up the images
Having scanned the images the next step is to extract the images, tidy where necessary, crop and rotate. Start by created a folder in the root of the CD called “fixed”, this is where you should put the tidied up images.
I believe it is important to have a consistent naming convention. This will mean that if, some time in the future, you want to do some automated task like putting them into albums on a tablet then you can.
| Cover.jpg | The cover art for the jewel case |
| Cover_Small.jpg | Same as cover but at 50%. This is used as artwork for music |
| Back_01.jpg | The back art from the jewel case |
| Label_01.jpg | The artwork on CD 01 |
| Leaflet_01.jpg | Page 01 of the leaflet/booklet |
| Jacket_01 | Outside jacket for CD (Jacket_01A.jpg – if there are multiples) |
| Misc_01 | Misc stuff (Misc_01A.jpg – if there are multiples) |
| Box_01 | If the CDs came in a cardboard box |
The printing on leaflets, back cover and the actual CD falls into two categories, images and text/lines. Looking at a color image and text side by side, as below, from the same CD, at the same zoom we can see a noticeable difference:

The image is broken into dots for the printing process while the text is often relatively clean and sharp. Images, notably photos, have to be created as a series of colored dots to allow for a range of colors and hues. Text on the other hand is usually printed as one color and is nice and sharp.
Read my posts Fixing moiré patterns – text mixed with images and Removing moiré patterns using GIMP for ways to remove moire patterns and how to remove these patterns when then are in an image with text.
Resizing images
As discussed earlier after cropping and tidying up the images the next step is to resize the images to 400 dpi. First create yet another folder in the root of the CD folder calling it “stuff”.
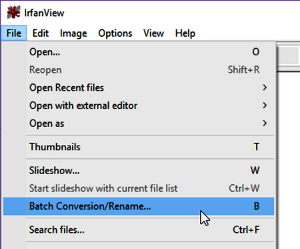
For this I use IrfanView as it has a great batch process. Select “File | Batch Conversion/Rename…”:
From the batch conversion dialog navigate to the “fixed” folder for your images and then click on “Add all” to transfer all images to the lower section:
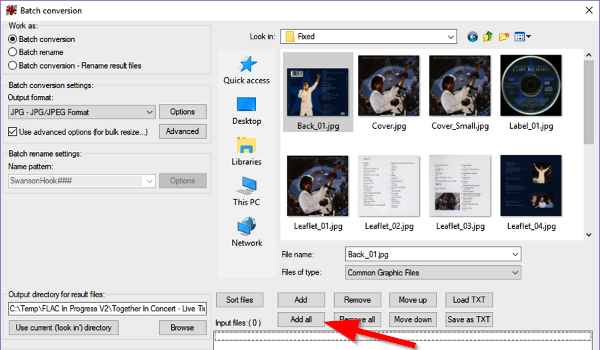
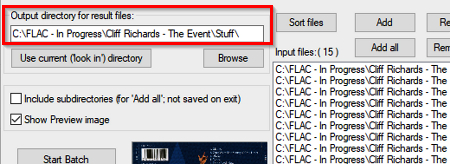
Now set the output folder to the “stuff” folder you just created:
Set the options to maximum quality:
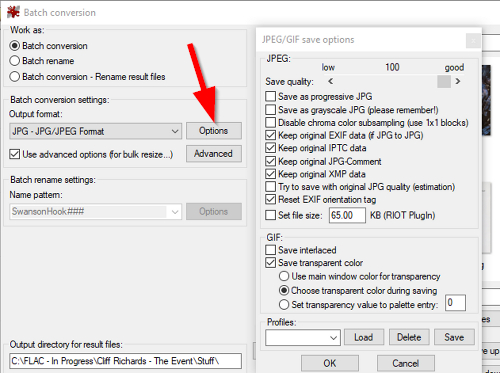
Click “OK” to close the “JPEG/GIF save options”. And click on the “Advanced” button just below the “Options” button you just used. Now set as below:
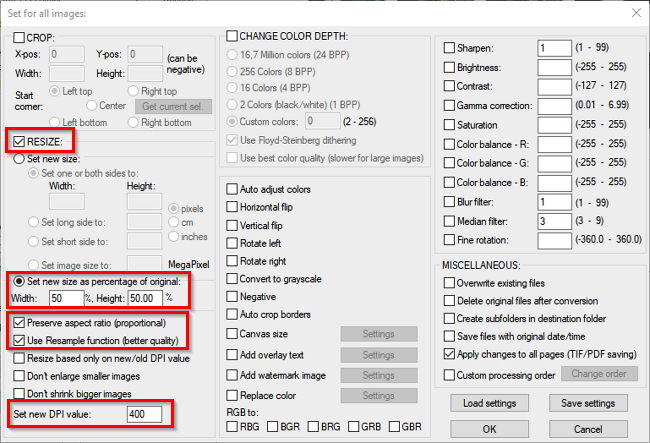
As you can see from above be sure to:
- Select “RESIZE”
- Set the size of the converted image to 50% of the original
- Select both “Preserver aspect ratio (proportional)” and “User Resample function (better quality)”
- Set new DPI value to 400
Click on “OK” to close this dialog.
Now click on the “Start Batch” button on the bottom left of the “Batch conversion” dialog. This will run the conversion.
After the conversion is finished click on “Return to batch”. This will drop you back to the “Batch conversion” dialog where as clicking “Exit batch” will take you right back to Irfanview.
Check for white or black lines
It is quite easy to miss a white or black line down the side of an image. Normally this is not a huge issue but with the “Cover” artwork it can at times really show up as below:
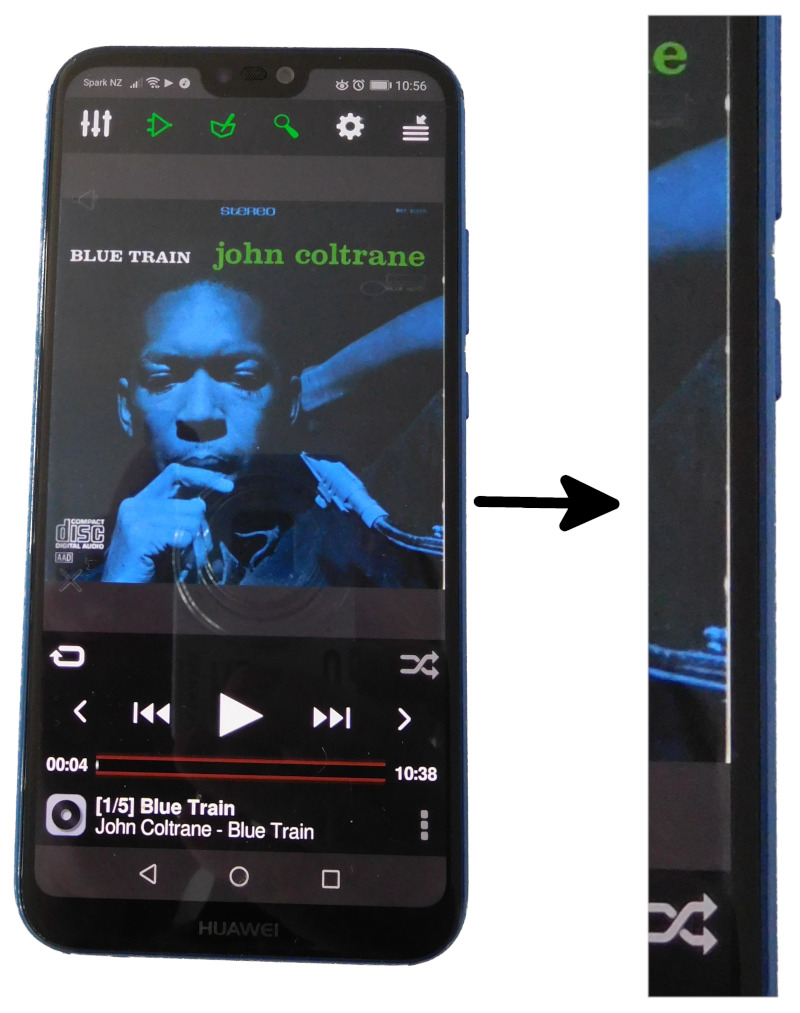
In the above you can see a white line down the right hand side of the cover artwork.
In Irfanview you can set the background color so you should set the “Viewing | Main window color” to black and ensure there is a border around your image. Now you should be able to work through the cover images to find those that need fixing.
Check your work !
At this point you should have all the artwork scanned and tidied up and resized in the “/stuff” folder.
Soon you will be zipping things up and deleting the original scans. Now is the time to check that the “/stuff” folder contains the correct artwork. Go through the stuff folder for each CD and double check the images are for the correct CD and you haven’t accidentally put the wrong artwork against the wrong CD.
Tips and tricks
When scanning a booklet it is a really good idea to review the pages you scanned to ensure you didn’t miss any. Some of the booklets can be very long and it can be very easy to miss a page.
Resources
Removing moiré patterns using GIMP (Zoyinc)
Fixing moiré patterns – text mixed with images (Zoyinc)
Scanning tips – stop the reverse side shinning through (Zoyinc)
Color balance in Gimp using an eye dropper (Zoyinc)
Scanning a booklet without an ugly crease (Zoyinc)



![[L] – WordPress UAM Locked Post](http://www.zoyinc.com/wp-content/uploads/2024/04/WordpressUAMLockedPost_Featured.jpg)
