 Zoyinc buttons are a very simple WordPress plugin created to solve a specific problem.
Download TinyMCE Zoyinc buttons
Background
I use the Weaver theme, TinyMCE Advanced and need to be able to include pieces of code using a syntax highlighter plugin. I would like to use Crayon Syntax Highlighter as it has a good rating and seems to work well.
The problem is that Crayon Syntax Highlighter, like most syntax highlighters, is built around using the “<pre” tag. Crayon can use other tags and do things other ways but it really doesn’t work as well and it feels like the other methods will deprecated anyway.
One cool thing I discovered was that with Crayon you can tell it to ignore a specific “<pre” tag by inserting “crayon:false” such as:
<pre class="crayon:false;">really interesting text</pre>
This is actually quite powerful because it means you can use Crayon for everything except “<pre”, you just have to put some extra bits in the “<pre” tag. But that’s the rub, its quite a pain to always have to jump into text mode, find the right spot and change the tag. The thing is I often put preformatted, “<pre”, tags in quite a few places in an article so bouncing between text and visual modes is a real pain
I spent sometime, probably much to much time, looking into this. I came to the conclusion the answer was to try to create a plugin that added button which wrapped the corrected “<pre” tag around the selected text.
The Plugin
As I have never written a WordPress plugin and my requirements were modest to say the least I based my work on another similar project:
Name: wp-heading-buttons
Author: Tercan Keskin
URL: http://tercan.net/
/zoyinc_tinymce_buttons.php
This appears to be the main interface with WordPress and TinyMCE. There is not a lot to say here as it seems pretty intuitive. The only thing you might change is the line:
array_push($buttons, '|', 'zbutton1');
which is where you add extra buttons. So if you wanted two buttons you would make changes in the javascript files and then change the above line to:
array_push($buttons, '|', 'zbutton1', 'zbutton2');
/js/tinymce_buttons_editor_plugin.js
This is javascript page where most of the changes occurred:
(function() {

	tinymce.PluginManager.requireLangPack('wpzbuttons');

	tinymce.create('tinymce.plugins.TinyMCEZButtons', {
		init : function(ed, url) {
			ed.addButton('zbutton1', {
				title : 'Standard Preformatted',
				image : url+'/../images/zbutton1.png',
				onclick : function() {
					var html = tinyMCE.activeEditor.selection.getContent();
					var tagtext = '<pre class="crayon:false;';
					ed.execCommand('mceInsertContent', false, tagtext+'">'+html+'</pre>');
				}
			});
			ed.addButton('zbutton2', {
				title : 'Custom Button',
				image : url+'/../images/zbutton2.png',
				onclick : function() {
					ed.execCommand('FormatBlock', false, 'h2');
				}
			});

		},

		getInfo : function() {
			return {
				longname : 'Zoyinc TinyMCE Buttons',
				author : 'Tony P',
				authorurl : 'http://www.zoyinc.com/',
				infourl : 'http://www.zoyinc.com/',
				version : "1.0"
			};
		}

	});
	tinymce.PluginManager.add('wpzbuttons', tinymce.plugins.TinyMCEZButtons);
})();
The highlighted lines are the interesting ones:
“tinyMCE.activeEditor.selection.getContent()” grabs the content that you have selected allowing you to put it into a variable, in my case “tagtext”.
“ed.execCommand(‘mceInsertContent’, false, tagtext+’”>’+html+'</pre>’)” allows you to replace the selected text, which you put in “tagtext” with new text.
Be aware you can’t just put any old thing in with “mceInsertContent”. I had times when I added text but it was all stripped out by TinyMCE and replaced with simple “<pre” tags. So you may want to approach this slowly and do a bit of experimenting to discover what you can achieve.
Installation
This plugin is currently not on the WordPress plugin site as it’s just too much trouble for such a small one-off plugin.
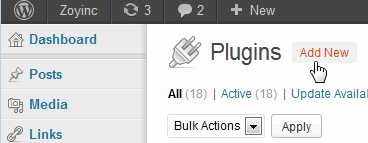
To install simply download the plugin zip file: zoyinc_tinymce_buttons.zip and then go to plugins and click on new:
 From there click on “Upload”
 And then upload the zip file:
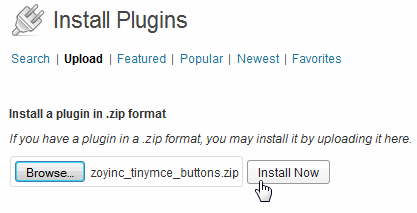 From here you just activate the plugin.
There is no configuration to this plugin. If you want to modify it you have to edit the code – sorry.
Tips
Editing a plugin
I found I was constantly tweaking files and testing them to see the result. I started by editing on a Windows PC then zip and uploading. This becomes a real pain if you are doing a lot of small tweaks and edits.
Firstly the location of the files would be somewhere along the lines of:
/wp-content/plugins/zoyinc_tinymce_buttons
I run WinSCP from my desktop and edit the files from there. When I save the file WinSCP notices and uploads the file to the server. Refreshing the browser then shows the changed file – simple quick.





![[L] – WordPress UAM Locked Post](http://www.zoyinc.com/wp-content/uploads/2024/04/WordpressUAMLockedPost_Featured.jpg)
