Rip the music to FLAC
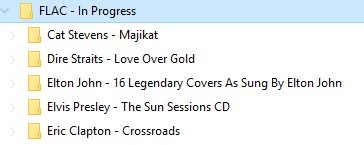
First rip the CD Using EAC and the post Archiving a CD using Exact Audio Copy (EAC). This will put the ripped songs *.flac, EAC log file *.log, CUE file *.cue and playlist *.m3u8 files in the root of the folder for that CD:
Archive the artwork
Archive the artwork by following Archiving CD artwork which should leave all the fixed artwork in a folder called “stuff”
Clean up the folders
Move the *.cue, *.log and *.m3u8 files into the “stuff” folder with the artwork.
For multi CD sets you need to move both sets of these files under the “… CD1\stuff” folder. You may possibly need to do some renaming of these files to avoid CD1 and CD2 files being named the same.
Take a copy of the “Cover.jpg” file from the “\stuff” folder and copy it to the root folder for the CD. We need this file in with the flac files because some apps, like Kodi, will automatically assume the “Cover” art is a file, located with the flac files, called “cover.jpg” or “folder.jpg”.
So at this point, for a multiple CD set, you will have one “stuff” folder in the root of the CD1 folder. The “stuff” folder will contain all the fixed artwork plus the *.cue, *.log and *.m3u8 from all the CDs for this album.
Note: Previously I would zip up the “stuff” folder, but I don’t do that now as zipping jpgs doesn’t save space and leaving them lose in a folder is much easier when working with Kodi.
Shortly we will start deleting things like the original “Raw” and “Fixed” folders from scanning the artwork. So at this point I would suggest creating a copy of everything, in say a “backup” folder.
Now cleanup by deleting the “Raw” and “Fixed” folders.
Tidy up the tracks in Media Monkey
While not perfect Media Monkey, at the time I was looking a few years ago, was the only one that could save in FLAC and yet the resultant files were convertible to ALAC, Apple Lossless Audio Codec, whilst retaining all the info including artwork and metadata.
At this point I have a folder “C:\FLAC – In Progress” which contains a sub-folder for each album I have ripped and at this stage double CD albums have a separate folder for each CD.
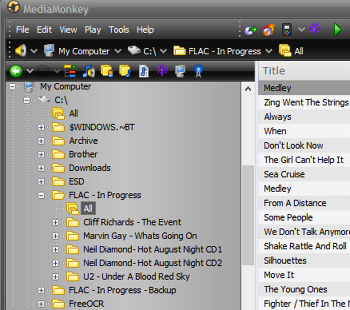
In Media Monkey you need to select the “All” folder under “C:\FLAC – In Progress” as shown below:
So ensure that the backup copy is well clear as this will really complicate things.
Double CDs
If you had a double CD like I did with Neil Diamonds “Hot August Night” then this is when you tidy all this up.
Select all the tracks from CD 1 and right click selecting “Properties”.
At this point the “Album” might show as something like “Hot August Night (Disc 1)” change this to the correct name for the album. Also change the “Disc #” to the number of the disk – I would suggest keep it to one digit so “1” and “2”. Be sure only to change details which are the same across all tracks – usually you only need to change album name and disk number:

Now combine all the music tracks into one folder – because we have now used the metadata to correctly identify which ones are on which disc.
Probably you will need to rename this folder as well, from say “Neil Diamond- Hot August Night CD1” to “Neil Diamond- Hot August Night”
Multiple artists
Remember if you have multiple artists on one track then set “Artist” to something like:
Frank Sinatra;Barbara Streisand
The key points use the “Artist” field and separate artists using a semicolon “;”. Most apps do NOT support the semicolon but then again they don’t support anything else for multiple artists either – lose lose situation.
Clean up the metadata and add artwork
Go through all the CDs selecting all the tracks for one album and then selecting the properties for these tracks. Check things like:
- Artist – Check spelling. If in doubt at least keep it consistent with what you have done for other albums by the same artist.
- Album artist – Usually the same as Artist but not always
- Genre
- Date
- Disc #, even if it is not a double CD still put 01
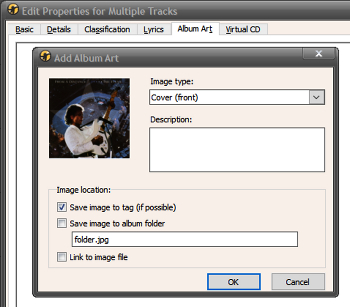
Go to the “Album Art” folder and add the “Cover_Small.jpg” file you put in the root of the CD folder. Just select “Save image to tag (if possible):
Double check the artwork
I have found that Media Monkey, at least the version I am using, sometimes doesn’t embed the artwork in all tracks and in particular the last track. I would suggest when you are finished adding all the artwork that you step through each track, in Media Monkey, and check the artwork shows. This is fairly painless just use the down cursor on the keyboard and step through each track.
Merge CD2 folder into CD1 folder
If you have any multi CD sets you should move all the files from the CD2 folder into the CD1 folder and delete the CD2 folder. Remember you have now give and CD1 folder the tag of “Disk 01” and the CD2 files the tag of “Disk 02”.
Refresh the list in Media Monkey
Now we have moved around stuff and merged folders you should refresh the list in Media Monkey
Convert to ALAC and test in iTunes
Read the article Converting FLAC to ALAC using xrecode to see what I do.
Checking in iTunes is really helpful because it will frequently show up mistakes you have not seen so far – such as where there is no artwork for certain tracks. It is also very helpful, at least to me, so that if you get an iPhone it will display and work as you want.




![[L] – WordPress UAM Locked Post](http://www.zoyinc.com/wp-content/uploads/2024/04/WordpressUAMLockedPost_Featured.jpg)
