 Zoyinc is my “brand” and this is my site so when I decided to auto-post to Facebook I thought it would be straight forward, but it did quite work out that way. These are some of the tips I found out along the way, yes the info will date because Facebook is a constantly evolving beast and WordPress plugins will change, but hopefully the info will be helpful.
Open Graph
Its important to understand “Open Graph”, at least just a bit. It is an open standard introduced by Facebook that allowed websites to include meta tags which social media sites could use to make decisions about importing posts from places like WordPress.
When you post to Facebook you are not creating a post like you would if you logged into the Facebook app and uploaded an image and added text, you are instead pointing to a website and letting Facebook determine what title, image and text to put in the Facebook post – you have little control over this. So you really need Facebook to know what you want it to post and this is done by defining “Open Graph” meta tags. The most import of these meta tags are:
og:title: The title of your post
og:type: The type of post (Category)
og:image: The image you want Facebook to use
og:description: A short description of you post, this would be the text that appears in Facebook.
There are a number of WordPress plugins that are focused on adding this info, I currently use “Facebook Open Graph, Google+ and Twitter Card Tags”. As you can see above most of the meta tag information can easily be found from your WordPress post – apart from the image and that’s the rub.
The problem is that the obvious image choice would be your “Featured” image in WordPress, but that is very small and may be customized to fit that small form factor. This means you would likely want to pick another image to go to social media. This is where Open Graph comes in with it’s ability to describe the image/s which you would like used in social media. This is why I wanted an Open Graph plugin that allowed me to easily pick this image – like many similar plugins “Facebook Open Graph, Google+ and Twitter Card Tags” has a graphical tool for selecting that from you media gallery.
First steps
Before you start you should create a “Privacy Policy” page on your site. My Zoyinc Privacy Policy page is relatively simple and was created at Private Policies.com. Google about it, you will find lots of info. In short it is driven by regulators and law makers who want sites, especially commercial ones, to explain to users how they deal with personal info. This is not a Facebook specific thing, Google for example requires it if you want to use Google AdSense.
Create a Facebook page
I am assuming you are going to have a dedicated page where you will post your WordPress posts, because that was my goal. This is not mandatory and you can use your default personal page if you want.
Create a page, I did mine as a “Brand or Product” with the category “Website” – I called mine “Methugalug”. I would suggest you create a Vanity URL, in my case https://www.facebook.com/methugalug. To set the Vanity URL click on the “Create Page @” link and put the name you want – be warned you do need 25 likes to be able to do this :-(.

Depending on what you want to do you may also want to set your Facebook settings so “Who can see your future posts?” is set to “Public”
Create an app
You need to create a Facebook app to allow you to post from WordPress.
First go to Facebook for Developers and click on “Get Started”. Just work your way through and it will prompt you for “Lets get started with your first app”. At this point you will need to give your app a name, in my case “Post to Methugalug”.
On the “Which of these best describe what you do” I put “Product Owner/Manager”. Following this you will be prompted to “Add Your First Product”, click on this button but don’t add a product – it doesn’t seem mandatory and you don’t need one in order to post to Facebook.
Settings
Basic
On your app page you should set the following:
- App Domains: This is the domain your website might be access by. This would be something like “www.zoyinc.com” and
- Privacy Policy URL: This is the link to the privacy page you created earlier
- Category: You should probably set this also
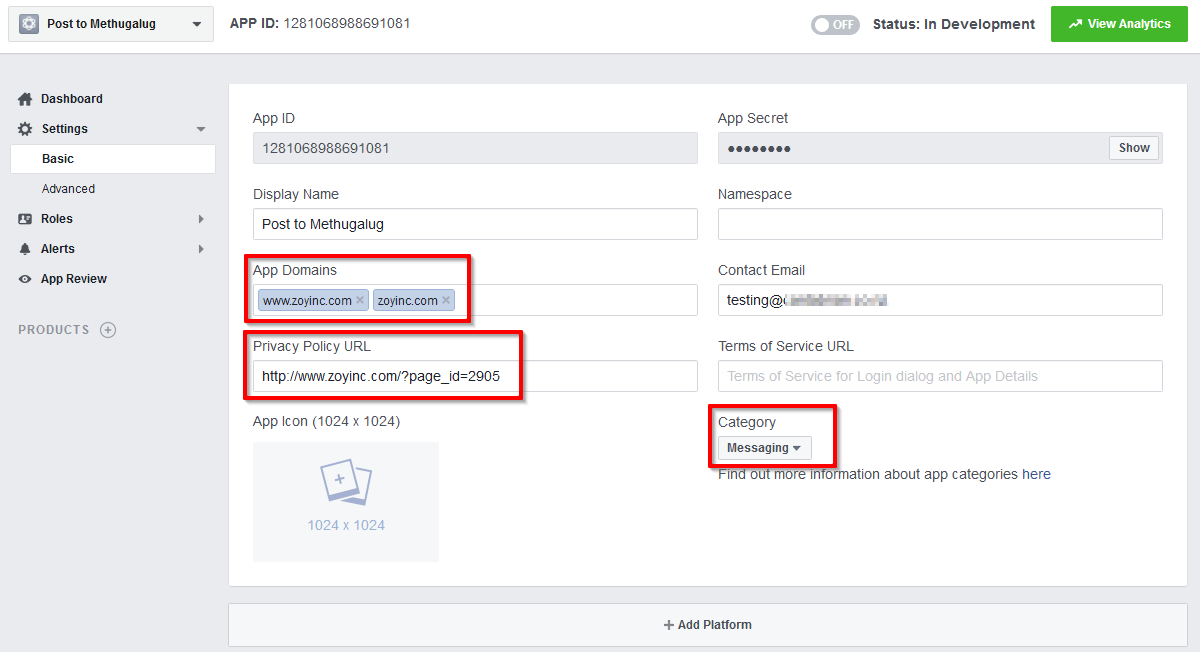
You should now add a “Product” of “Website”. On the page above “Settings | Basic” click on “+ Platform” and select “Website” and put in the website you are publishing from so something like “http://www.zoyinc.com/”.
Now go to the “Settings | Advanced” section and scroll down till you find “Domain Manager” and click on “Add Domain” to this add your websites domain:
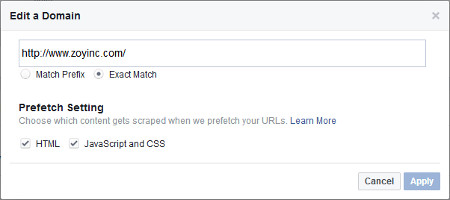
Ensure you scroll down and click on “Save” in Facebook to save this change.
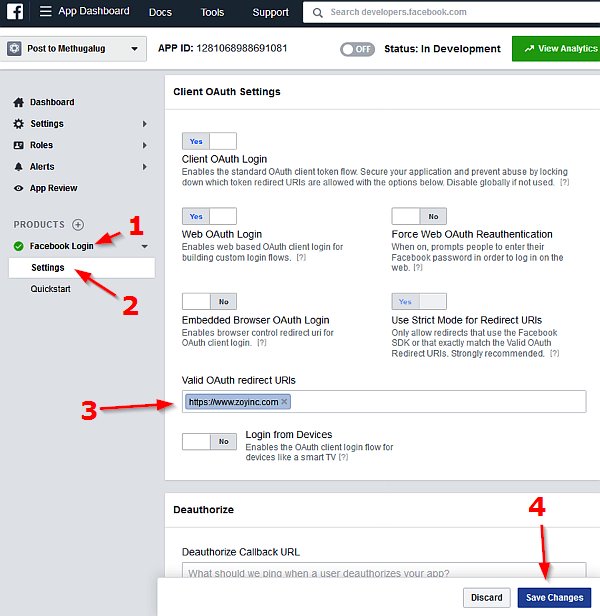
From the left side of the dashboard click on “Facebook Login”, this will expand and you should then click on “Settings”. Scroll down the panel on the right side so you can see “Client OAuth Settings”.
You need to add your login domain, note you may be using “https” for this as I am. As before don’t forget to click on “Save Changes” when finished:
After this you may see the below warning which is normal and doesn’t appear to require any action:

WordPress plugin configurations
I use two plugins for this, “NextScripts: Social Networks Autoposter (SNAP)” for posting to Facebook and “Facebook Open Graph, Google+ and Twitter Card Tags” to set the “Open Graph” settings.
Facebook Open Graph, Google+ and Twitter Card Tags
You should go to the settings for this plugin. Then on the “Open Graph” tab select “Include Facebook Platform App ID”, this will then show the “Facebook Platform App ID” field, you populate this with your “App ID” from your Facebook app. Also fill in the “Website’s Facebook Page”.
Also on the same “Open Graph” tab scroll to the bottom to the “Facebook Open Graph Tags cache” section. populate the “App ID” and “App Secret” fields using the values from your Facebook app.
Requirements (as of Feb 2018)
- Image size must be at least 200 x 200 pixels, up to 8MB. Ideal minimum is 600 x 315. Be wary of images that are skinny, I have go caught by this before.
- If your server is too slow responding Facebook may not use the image
- You need to include your “App ID” in your metadata
You should be able to get the up-to-date requirements from Facebook: Sharing Best Practices for Websites & Mobile Apps/
Now go to a sample, published, post on your WordPress site and now down the bottom you will see the “Open Graph” panel. From here select a unique image that has nothing to do with the post and “Update” the post.
Now go to the Facebook debugger site: https://developers.facebook.com/tools/debug/
Enter in the URL of your WordPress post and click on “Debug”. In my case I ended up putting in an “https://” URL but the certificate was self-signed so Facebook didn’t go to the site and brought back nothing :-(.
You may find the debugger doesn’t necessarily bring back the new image, especially if the post is old, so click on the “Scrape again..” button:
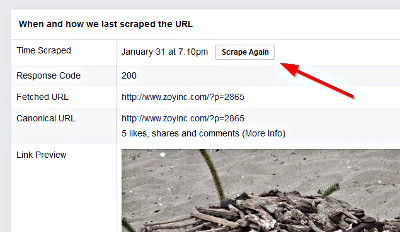
This debugging page is really useful to get to the bottom of any problems with the setup. For example it might return something like:
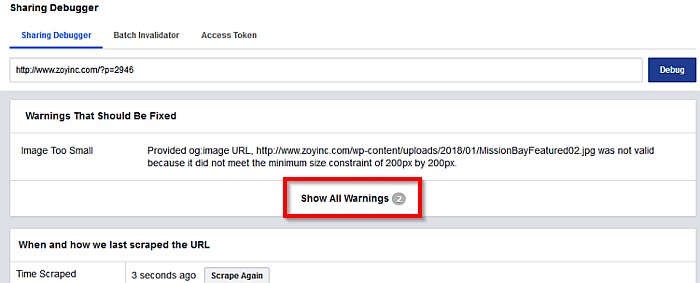
You can see above that the image provided is too small, so clearly this needs to be fixed. In addition it has a “Show All Warnings” button. Click on this and you will see:

So you can see that the property “fb:app_id” is also missing. This setting is the “Facebook Platform App ID” field which I described earlier.
My suggestion would be to remove all errors in Facebook debugger before continuing!
Social Networks Autoposter (SNAP)
Before starting please ensure that for the current browser session you are currently logged into Facebook as the admin of the Facebook site you want to publish to.
This plugin shows in the dashboard as “SNAP|AutoPoster”, under SNAP select “Accounts”. From here click on “Add new account” and select “Facebook” from the dropdown.
You will need to populate this with the details from your Facebook app. So open up another tab in your browser to “Facebook for Developers”: https://developers.facebook.com/apps/. After setting the “Account nickname” in SNAP you need to set the “App ID” and “App Secret” from Facebook.
Since we have multiple possible places to post in Facebook you need to select from the “Where to Post” drop down. Simply click on the green refresh button as below:
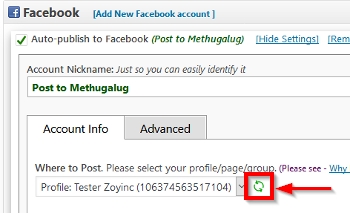
Then select the page where you want all posts to go:
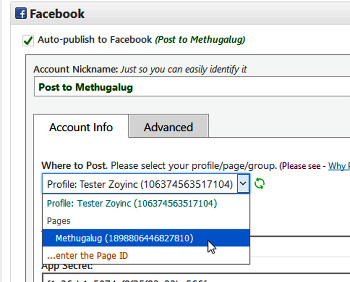
Once this is done you need to save – ensure you click on the “Update Account Info” and “Update Accounts” buttons.
Now we need to “Authorize” this account, so scroll down to the bottom of the screen and click on “Authorize Your Facebook Account”:
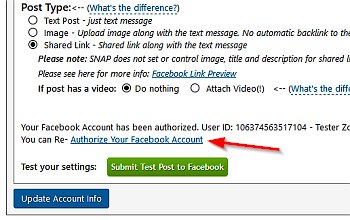
You should get the following:
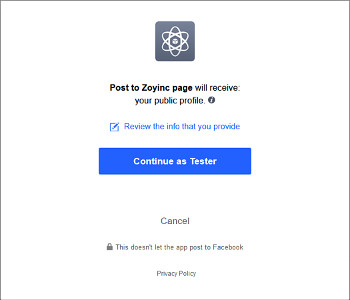
Click on “Continue as Testers”. If everything goes well you will see a dialog asking who should see the posts:
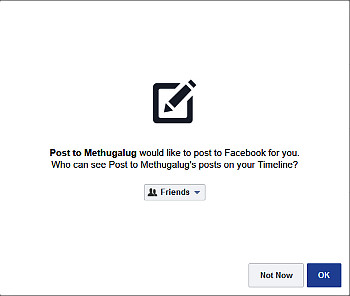
Change the drop down from “Friends” to “Public” and click “OK”. Then you will be presented with another dialog asking about permissions with publishing.
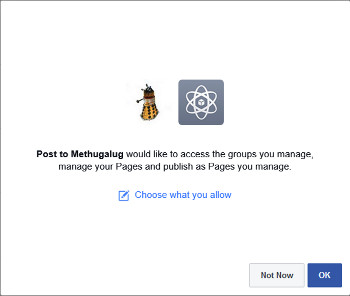
The the defaults allow full access but if you want to see the default permissions, or change them, then click on “Choose what you allow”. Then click on “OK”.
If all goes well you will see a temporary green dialog which will close on it’s own.
Final steps
Now try to publish a test post from WordPress by going to your post and scrolling down to the bottom and clicking “[Post Now]” – don’t forget to add a custom image before hand.
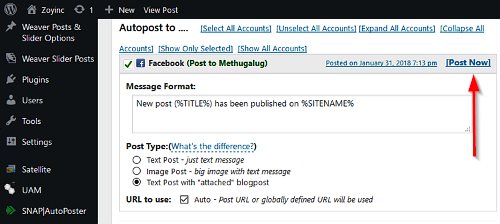
If this works you should see the post on your custom Facebook page. But there is a catch, it won’t be public, try logging out and seeing if you can see the post you won’t 🙁
Go to your app in Facebook you will see it has “Status: In Development” as below. Simply click on “OFF” and select confirm to the following dialog and you will be live.

You will now see any posts you previously added whilst in development are now visible. There is no need to repost.
Wahoo all done !
Resources
Facebook “Sharing Best Practices for Websites & Mobile Apps”
This describes what your WordPress page should be like for Facebook to use it best. It is a very good guide and give up-to-date details about minimum sizes etc.
https://developers.facebook.com/docs/sharing/best-practices/
Facebook developers
Apps page for Facebook developers:
https://developers.facebook.com/apps/
Facebook debugger
This page allows you to do a test Facebook scraping of your WordPress page so you can test how Facebook will interpret your post and what it will import.
https://developers.facebook.com/tools/debug/sharing/
Social Networks Autoposter (SNAP) WordPress plugin
This is the Facebook auto-poster I currently use for posting to Facebook.
https://wordpress.org/plugins/social-networks-auto-poster-facebook-twitter-g/
Facebook Open Graph, Google+ and Twitter Card Tags WordPress plugin
This is the plugin I use to setup the meta tags for Open Graph
https://wordpress.org/plugins/wonderm00ns-simple-facebook-open-graph-tags/




![[L] – WordPress UAM Locked Post](http://www.zoyinc.com/wp-content/uploads/2024/04/WordpressUAMLockedPost_Featured.jpg)
