I had a Windows 10 VM, running inside VMware ESXi 6.0, which I needed to connect to the laptop as shown in the above diagram. In addition I needed both the laptop and VM to be on an isolated LAN which meant neither the VM nor laptop to should be able to access the internet or our LAN – or indeed anything else.
Typically the situation to this problem would be to have two physical NICs, Network Interface Card, on the ESX server with one NIC connected to the LAN for ESX management and the other NIC connected to the laptop via a dedicated switch. However in my case I was going to have trouble actually plugging in another network card, as ESX was running on a small form fact PC – Lenovo M58P. In addition the ESX serverwas in the garage where it was going to be difficult to run another network cable to it.
The solution was to connect the VM to a VLAN, inside ESX, and connect this to my SonicWall. This is the same way that I connected my web server to the internet – see my post: Public facing web server on SonicWALL VLAN
In this case I could not use the DMZ zone because I didn’t want either the VM nor the laptop to have internet access plus I didn’t actually want it in the DMZ as this exists for the like of public web servers that might be the subject of an attack.
What I did
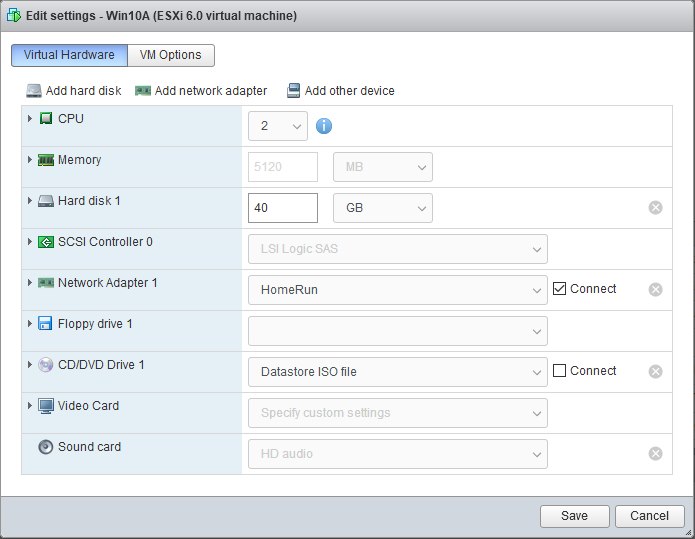
Within ESX I created a “Port Group” which I called “HomeRun” and configured it to use VLAN ID 15: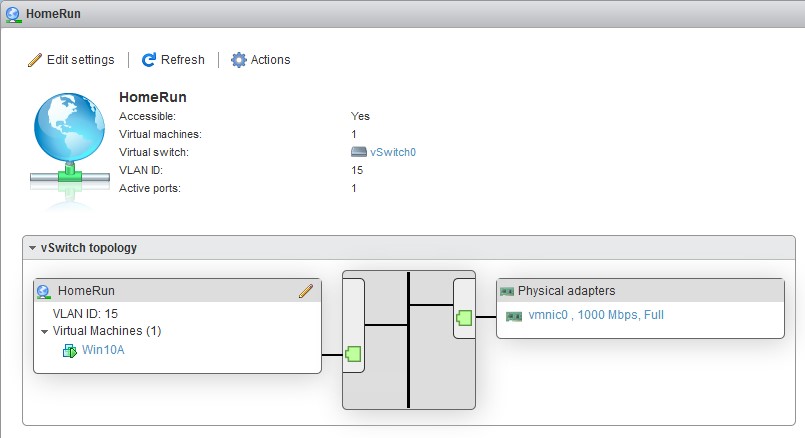 I setup the NIC for the VM to connect to the “HomeRun” ESX network:
 ESX has a “Management Network” port group, which is somewhat like a virtual interface. This is what the ESX vSphere client connects to or from ESX v6. 5 and above this is where you point your browser to in order to manage ESX:
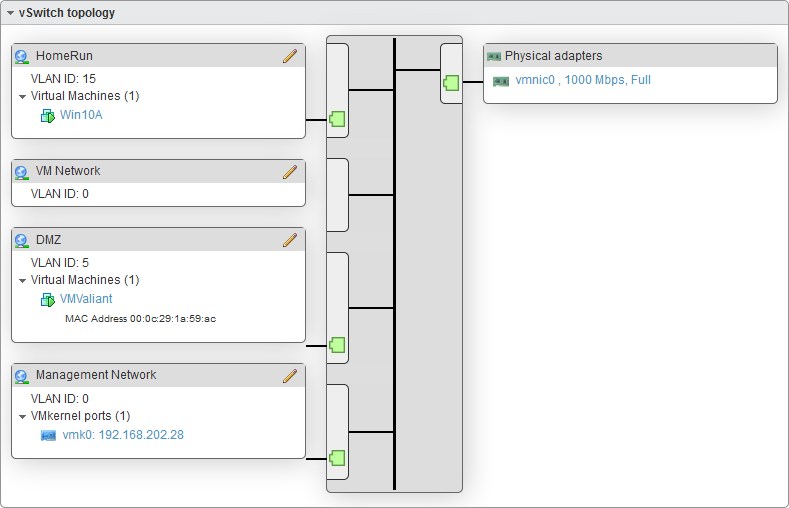 By putting our VM on a VLAN it means that it’s network traffic is isolated from the LAN – VLAN = “Virtual” LAN. So in our case this means that our VM is on one LAN and ESX management is on another LAN but all done with one single NIC on the ESX host. Works great, but leaves us with the challenge of connecting the VLAN/VM to a physical isolated Ethernet port on the SonicWall.
Next step was on the SonicWall where I create a new zone, under “Network | Zones”, as follows:
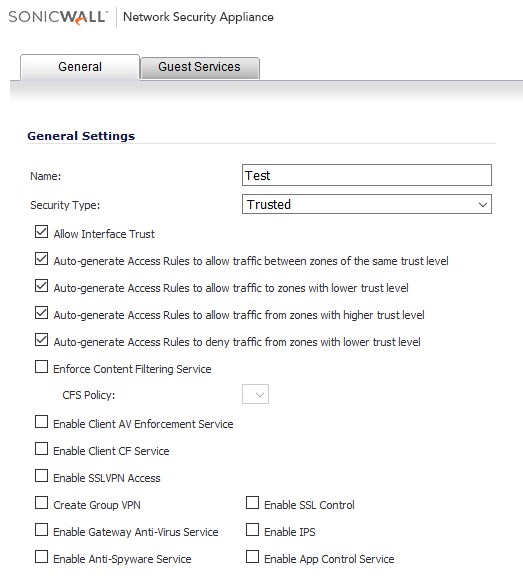
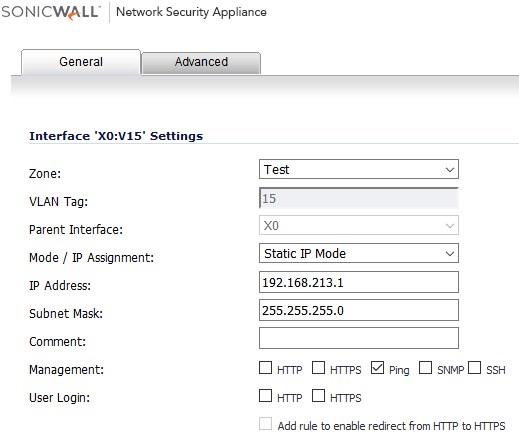
Next I created a “Virtual Interface” on the X0 interface in SonicWall. Remember that the X0 interface is the primary LAN interface and also where our switch connects to the SonicWall. So from “Network | Interfaces” select:

Then set this up thus:
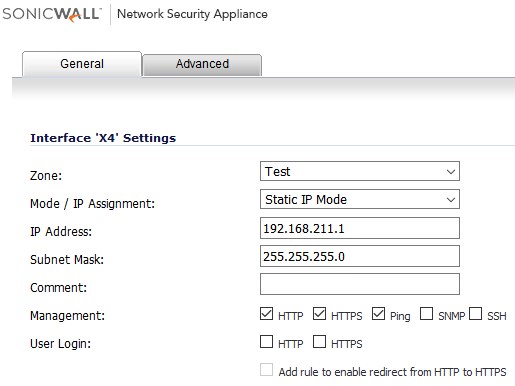
Now we have to configure the X4 interface, where the laptop is plugged in, to connect to see the VM. So in “Network | Interfaces” edit the X4 interface to be:
Routing
It is important to understand how things are routed. The current setup has
The VM has the following config:
Windows IP Configuration

Host Name . . . . . . . . . . . . : Win10A
Primary Dns Suffix . . . . . . . :
Node Type . . . . . . . . . . . . : Hybrid
IP Routing Enabled. . . . . . . . : No
WINS Proxy Enabled. . . . . . . . : No

Ethernet adapter Ethernet0:

Connection-specific DNS Suffix . :
Description . . . . . . . . . . . : Intel(R) 82574L Gigabit Network Connection
Physical Address. . . . . . . . . : 00-0C-29-12-EA-11
DHCP Enabled. . . . . . . . . . . : No
Autoconfiguration Enabled . . . . : Yes
Link-local IPv6 Address . . . . . : fe80::74dd:5518:4469:1771%5(Preferred)
IPv4 Address. . . . . . . . . . . : 192.168.213.66(Preferred)
Subnet Mask . . . . . . . . . . . : 255.255.255.0
Default Gateway . . . . . . . . . : 192.168.213.1
DHCPv6 IAID . . . . . . . . . . . : 100666409
DHCPv6 Client DUID. . . . . . . . : 00-01-00-01-1D-2E-B6-97-00-0C-29-12-EA-11
DNS Servers . . . . . . . . . . . : 8.8.8.8
NetBIOS over Tcpip. . . . . . . . : Enabled
The laptop is configured:
Windows IP Configuration

Host Name . . . . . . . . . . . . : Finn
Primary Dns Suffix . . . . . . . :
Node Type . . . . . . . . . . . . : Hybrid
IP Routing Enabled. . . . . . . . : No
WINS Proxy Enabled. . . . . . . . : No

Ethernet adapter Ethernet:

Connection-specific DNS Suffix . :
Description . . . . . . . . . . . : Intel(R) 82567LM Gigabit Network Connection
Physical Address. . . . . . . . . : 78-E7-D1-AF-EB-33
DHCP Enabled. . . . . . . . . . . : No
Autoconfiguration Enabled . . . . : Yes
Link-local IPv6 Address . . . . . : fe80::7183:b94c:318c:d324%4(Preferred)
IPv4 Address. . . . . . . . . . . : 192.168.211.44(Preferred)
Subnet Mask . . . . . . . . . . . : 255.255.255.0
Default Gateway . . . . . . . . . : 192.168.211.1
DHCPv6 IAID . . . . . . . . . . . : 58255313
DHCPv6 Client DUID. . . . . . . . : 00-01-00-01-1F-2B-1D-4F-78-E7-D1-AF-EB-33
DNS Servers . . . . . . . . . . . : fec0:0:0:ffff::1%1
fec0:0:0:ffff::2%1
fec0:0:0:ffff::3%1
NetBIOS over Tcpip. . . . . . . . : Enabled
As you know that the VM is on the “X0:V15” interface under X0 and it has an IP of “192.168.213.1”
The laptop is on the X4 interface which has an IP of “192.168.211.1”.
The important thing here is the configuration of the gateway for the VM and the laptop so that the packets for the other end are directed through the appropriate gateway
Obviously it is vital that both the “X0:V15” and “X4” interfaces are on the same zone – in this case “Test”
Challenges and things to watch out for
During this exercise I had a lot of challenges. Frequently my diagnostic methods didn’t always go to plan. Typically I would try to ping something, like the laptop and it would fail. I would assume that the problem was my SonicWall setup but in actual fact it was because the Windows firewall on the laptop, thinking it was in a public area, would drop all pings.
For for both the VM and the laptop I turned off the firewall while I was doing the setup and diagnostics – you may want to enable the firewalls when finished ?
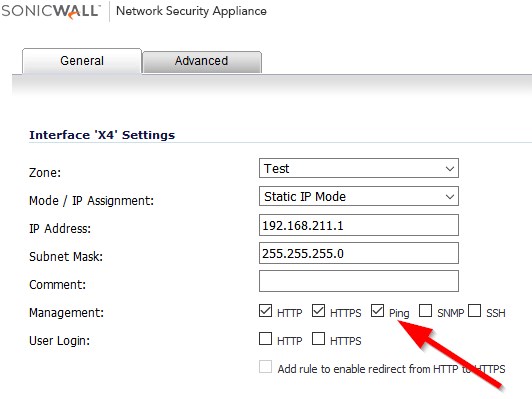
Likewise I would try to ping the gateway in the Sonicwall and the ping would not return. However the problem was that the interface in SonicWall did not have “ping” enabled:
Testing of the complete solution
I have tested the above configuration and from the VM I can RDP to the laptop and from the laptop I can RDP to the VM.




![[L] – WordPress UAM Locked Post](http://www.zoyinc.com/wp-content/uploads/2024/04/WordpressUAMLockedPost_Featured.jpg)


