 Fortunately Open Media Vault, OMV, emails warnings when disks are failing. This is also true for the system disk. I have been getting warnings my old system disk is failing and this is what I did to fix it.
First shutdown the PC and disconnect the RAID disks – just to ensure you don’t do anything to them by accident.
Rule 1: take your time, double check things especially things like if it is “/dev/sda” or “/dev/sdb” etc.
Backup the current disk
First create a USB book disk running Debian using the instructions Create a Debian Live USB fshutdowlash drive and boot from it.
Login the Debian and follow the instructions Enabling SSH access to Debian live USB to enable ssh access to the host. Ensure you run ifconfig so you can work out the IP of the PC now it is running Debian live.
From your personal PC run a putty session to the Debian live instance – using the IP you got above. Doing the rest from your personal PC will make life a lot easier, you can copy and paste instructions etc. etc.
From the Putty use the instructions in Backing up Open Media Vault to backup the drive to remote storage.
Now shutdown the PC, you can just turn it off, not need to shutdown gracefully. Swap out the old hard drive and put in the new one. Ensure the RAID disks are disconnected just to be sure and again boot to the Debian live USB key. Once again follow the instructions to enable ssh, Enabling SSH access to Debian live USB.
Again follow the instructions in Backing up Open Media Vault but this time follow the instructions in the section “Doing a restore”.
When the restore is done shutdown the OMV server using:
shutdown -h now
Restore to the new system disk
Now unplug the USB and restart the server using the new system disk – but with RAID still disconnected. If that works again shutdown the OMV server and then connect the RAID drives. Finally restart with everything finished.
Login to the server and check under S.M.A.R.T. to check the new system disk and old RAID disks are preent:
Also login to RAID Management and check everything looks good by selecting the RAID, in our case “nas2:Mirror” and click on details:
 Enable S.M.A.R.T. monitoring
First enable monitoring for this new disk by going to S.M.A.R.T where you will see the new disk, this time a Fujitsu rather than a Toshiba and you will see monitoring is not enabled.:
 Select the new disk, FUJITSU in my case, and click on “Edit”. You will get a “Device Properties” dialog, select “Activate S.M.A.R.T. monitoring” and click on Save. At the top of OMV you will be prompted to “Apply” – click on “apply” and wait for the config to be applied.
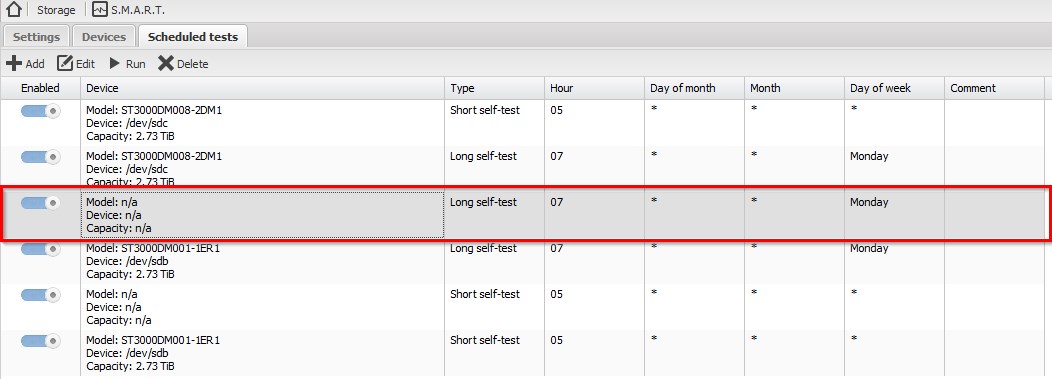
Because it is a replacement drive if you go to “Scheduled tests” under S.M.A.R.T. and assuming you have set up monitoring using Hard disk SMART monitoring and alerts in OMV you should see something like:
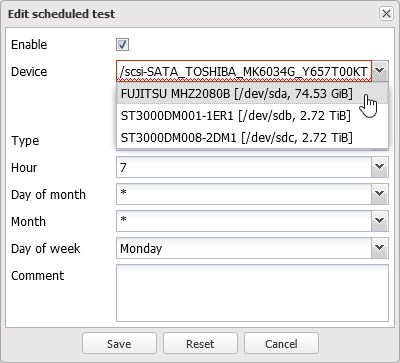
 Because the disk has been removed it shows “n/a”, not applicable. Double click on this scheduled test and you will get a popup:
 Select your new disk, in our case FUJITSU, and click on Save.
Repeat this for the second scheduled test which is also marked as n/a – remember we have two scheduled tasks, a short one once a day and a long one once a week on Monday.
Again you will see a bar at the top of OMV prompting you to apply the changes. Once you are finished click on “Apply” to apply the new changes


![[L] – WordPress UAM Locked Post](http://www.zoyinc.com/wp-content/uploads/2024/04/WordpressUAMLockedPost_Featured.jpg)


